Master the Perfect Steak: Searing, Salting & Resting Guide
The sizzle of a steak hitting a hot pan, the rich aroma filling the kitchen, and the anticipation of that first tender, juicy bite – few culinary experiences rival a perfectly cooked steak. Yet, achieving that elusive ideal can seem daunting. What's the secret to a deeply flavorful crust, a succulent interior, and an evenly cooked masterpiece? It comes down to mastering a few fundamental techniques: salting, searing, and resting. Forget the guesswork; this comprehensive guide will equip you with the scientific principles and practical tips needed to unlock your ultimate
perfect steak recipe, transforming your home cooking from good to gourmet.
The Science of Salting: Timing is Everything for Flavor & Sear
Salting a steak seems straightforward, but the timing of this crucial step is one of the most debated topics among chefs and home cooks alike. Should you salt immediately before cooking, an hour in advance, or even days ahead? The answer, surprisingly, isn't a single universal truth but rather a window of opportunity.
Extensive culinary experiments, mirroring those conducted by top food scientists, reveal a fascinating process at play. Imagine you're preparing a thick-cut, bone-in ribeye. Here’s what happens at different salting intervals:
*
Immediately Before Cooking (0-5 minutes): When you salt just moments before searing, the salt granules remain on the surface, largely undissolved. They haven't had time to interact significantly with the meat's moisture. This means the surface remains relatively dry, allowing for an immediate, aggressive sear and the rapid development of a delicious crust through the Maillard reaction. The steak's juices are still locked within the muscle fibers.
*
The "Danger Zone" (10-30 minutes): This is where things get tricky. As salt sits on the meat's surface for a short period, it begins to draw moisture out through osmosis. Tiny beads of liquid accumulate on the surface, creating a thin, salty brine. If you cook the steak during this phase, you're essentially steaming it in its own juices, making it incredibly difficult to achieve a crisp, brown crust. This "wet" surface actively works against a good sear.
*
The Sweet Spot (40 minutes to Several Days): Ah, now we're talking! If you allow the salt to remain on the steak for at least 40 minutes (and ideally longer, even up to 24-48 hours in the refrigerator), something magical happens. The drawn-out moisture first dissolves the salt, creating a concentrated brine. Then, given enough time, the steak's muscle fibers reabsorb this flavorful brine. Not only does this carry the salt deep into the meat, seasoning it from within, but it also leaves the surface *dry once again*. A dry surface is paramount for a superior sear. This nuanced approach is key to any truly
perfect steak recipe.
For best results, season your steak generously with coarse salt (like kosher salt) either immediately before cooking (within 5 minutes) or at least 40 minutes in advance, ideally several hours or even overnight. This pre-salting is a game-changer for flavor and crust development.
Mastering the Searing Process for That Irresistible Crust
The sear is where the magic of the Maillard reaction truly shines, transforming the steak's exterior into a complex, savory, and richly colored crust. Whether you're using a pan or a grill, the principles remain similar. Mastering this technique is a cornerstone of any
perfect steak recipe.
Pan-Searing Perfection
For an unbeatable pan-seared steak, a heavy-bottomed pan, preferably cast iron, is your best friend.
1.
Heat it Up: Place your pan over high heat until it's smoking slightly. Add a high smoke point oil (like grapeseed, canola, or avocado oil) and let it get shimmering hot. This intense heat is crucial for an immediate and even sear.
2.
Warm Your Steak: Ensure your steak has sat at room temperature for at least 30 minutes before cooking. A cold steak hitting a hot pan will cook unevenly, leaving a wider gray band.
3.
Sear with Authority: Place the steak carefully in the hot pan. Don't overcrowd the pan; cook steaks one or two at a time to maintain high heat. For even cooking and a consistent crust, flip your steak frequently – every 30 to 60 seconds. This technique, popularized by food scientists, prevents the heat from penetrating too deeply into one side, allowing for a more uniform temperature from edge to center and building a superior crust.
4.
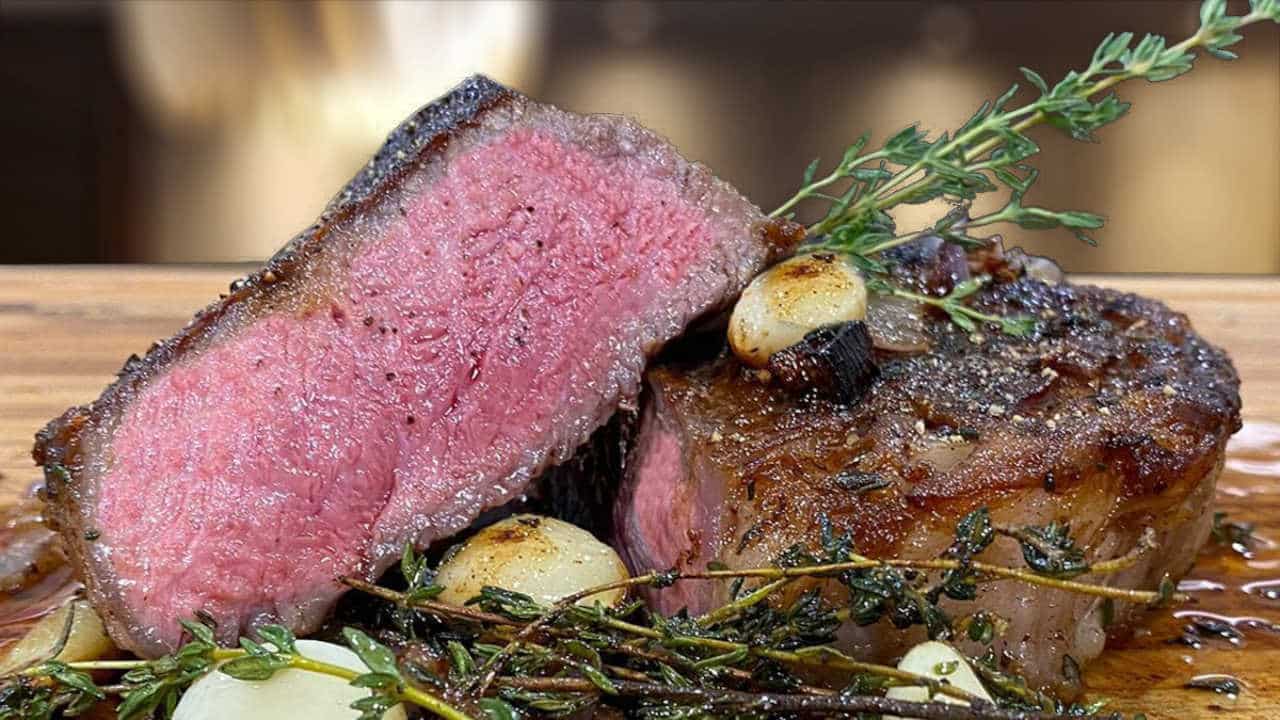
Basting for Flavor: In the last few minutes of cooking, add a knob of butter, a few sprigs of fresh thyme or rosemary, and smashed garlic cloves to the pan. Tilt the pan and spoon the melted, fragrant butter over the steak continuously. This basting infuses the steak with incredible flavor and helps to brown the crust further.
5.
Check Doneness: Use an instant-read thermometer for accuracy. For medium-rare, aim for 125-130°F (52-54°C) before resting. Remember, the steak's internal temperature will rise by a few degrees during resting.
Grilling for Charred Excellence
If you prefer the smoky char of a grilled steak, the principles of high heat and frequent flipping still apply.
1.
Prep the Grill: Set your grill for direct cooking at a very high temperature, around 600-650°F (315-345°C). Consider using a cast iron cooking grid for enhanced sear marks. Add a handful of wood chips (like hickory or mesquite) for an extra layer of smoky flavor.
2.
Trim and Season: Trim any excess, wispy fat from the steak, as this can cause flare-ups and bitter smoke. Season generously with your preferred rub or simply salt and pepper.
3.
Sear and Rotate: Place the steaks on the scorching hot grates. Sear for 2-3 minutes, then flip to a new section of the grate for another 2-3 minutes to maximize char. Continue flipping every minute or so until your desired internal temperature is reached.
The Critical Step: Resting Your Steak for Ultimate Juiciness
You've done the hard work: perfectly salted, expertly seared. Now comes the moment of truth that many often overlook: resting. Skipping this step is a cardinal sin that can turn a beautiful steak into a dry, disappointing experience.
When a steak cooks, the muscle fibers contract, squeezing the precious juices towards the center of the meat. If you cut into the steak immediately after it comes off the heat, those juices will gush out onto your cutting board, leaving you with a drier steak and a less flavorful bite.
Resting allows the magic of redistribution to occur. As the steak cools slightly, the muscle fibers relax, enabling the juices to flow back and evenly disperse throughout the meat. This results in a steak that is consistently tender and bursting with flavor from edge to edge.
*
How Long to Rest? A good rule of thumb is to rest your steak for at least 5-10 minutes, or about half the cooking time for thinner cuts, and up to 15 minutes for thicker cuts (1.5-2 inches).
*
How to Rest? Transfer your cooked steak to a cutting board, platter, or even a wire rack. Loosely tent it with foil to retain warmth without steaming the crust you worked so hard to achieve.
*
Against the Grain: After resting, always slice your steak against the grain. This shortens the muscle fibers, making each bite significantly more tender and enjoyable.
Achieving Even Doneness: Beyond the Sear
While the crust is king, an evenly cooked interior—free from an unsightly gray band—is the mark of a truly expertly prepared steak. The strategies mentioned earlier, like warming the steak to room temperature and flipping frequently, contribute significantly to this.
For those pursuing the absolute pinnacle of evenness, consider these advanced techniques:
*
Reverse Searing: This method involves cooking the steak at a low temperature (e.g., 225-275°F / 107-135°C) in an oven until it's about 10-15°F below your target internal temperature. This gentle cooking ensures a perfectly even pink from edge to edge. Then, the steak is transferred to a screaming hot pan or grill for a quick, intense sear to develop the crust.
*
Sous Vide: For the ultimate in precision cooking and tenderness, sous vide involves cooking your steak in a precisely temperature-controlled water bath. Once it reaches your desired doneness, it’s removed, patted dry, and then seared quickly for that irresistible crust.
Conclusion
Mastering the perfect steak is a rewarding journey built on understanding a few fundamental principles. From the precise timing of salting that impacts both flavor and sear, to the high-heat techniques for achieving a glorious crust, and finally, the crucial resting period that guarantees juiciness, each step plays a vital role. By integrating these expert tips into your routine, you'll consistently create a
foolproof steak: juicy grills & pan-sears with perfect crust that will impress even the most discerning palates. So, grab your favorite cut, fire up the pan or grill, and confidently embark on your quest for the perfect steak recipe!